How I successfully migrated my indie app to RevenueCat Paywalls
And how a simple experiment increased my LTV by 33%.


Charlie Chapman
When I’m not doing my day job as Developer Advocate here at RevenueCat, I develop an indie iOS app called Dark Noise. It’s a little ambient noise app I’ve been working on for years, and earlier this year I switched it to a subscription model (using RevenueCat, of course).
The app has a lot of little animations and UI touches, so I wanted to bring those into my paywall. I ended up with a design that looks like this.
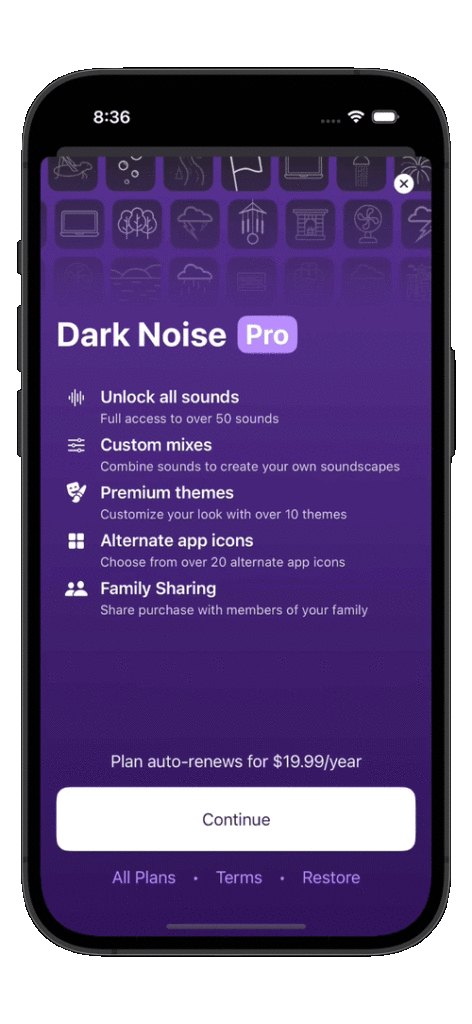
I was pretty happy with the design, but with it being entirely custom built, it meant I had to write a bunch of custom code when I wanted to run A/B tests to optimize the paywall. When RevenueCat launched the new Paywalls UI feature later in the year, I was really excited to switch my paywall to use it. Not only because I work here, but because I really wanted to start experimenting more with my paywalls and that would make it so much easier.
How I migrated my paywall to RevenueCat
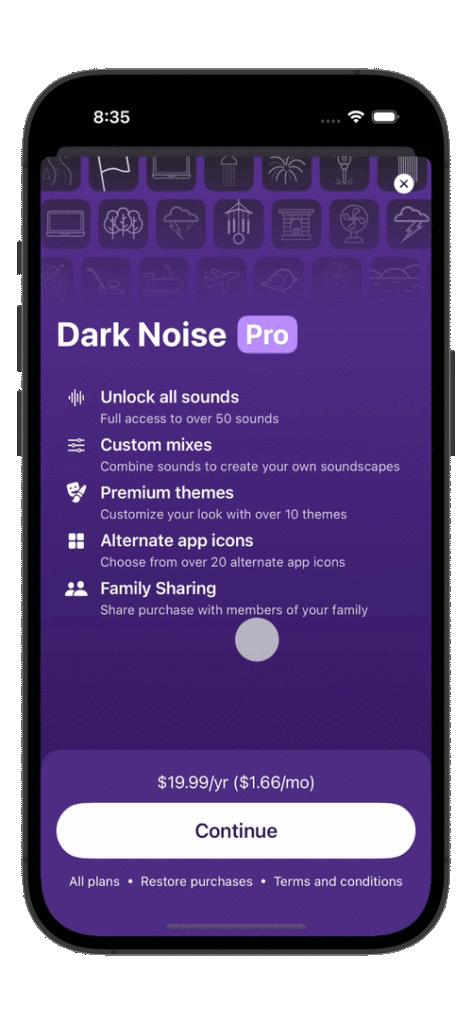
Using RevenueCat’s FooterView rendering mode, I was able to replicate my paywall design pretty effectively!
So now I have a paywall driven by RevenueCat and configurable from the backend, but making changes in the part of my app that actually brings in money is scary! I felt pretty confident it would work well, but I really wanted to make sure I didn’t break anything. So instead of simply switching my paywall to the new design and hoping for the best, I utilized RevenueCat Experiments to do a slow rollout and test that the new paywall performed at the same level as my custom paywall.
Here’s how I did it.
First, I duplicated the Offering I was using for my custom paywall in the RevenueCat dashboard and named it “Using RC Paywalls”.
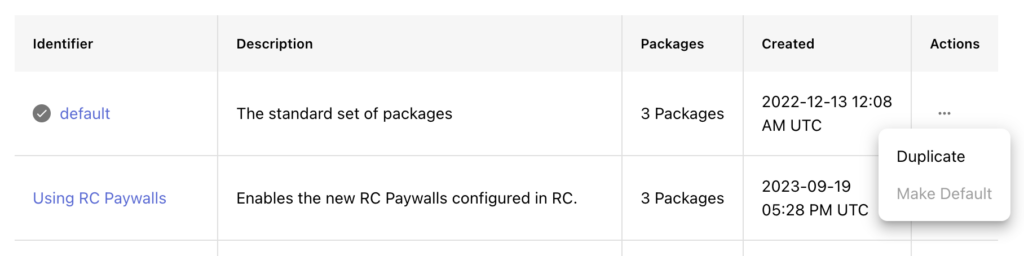
Inside of the “Using RC Paywalls” Offering I added an “rc-paywall” boolean to the Metadata and set its value to true. I did the same for my “default” Offering but set the value to false.
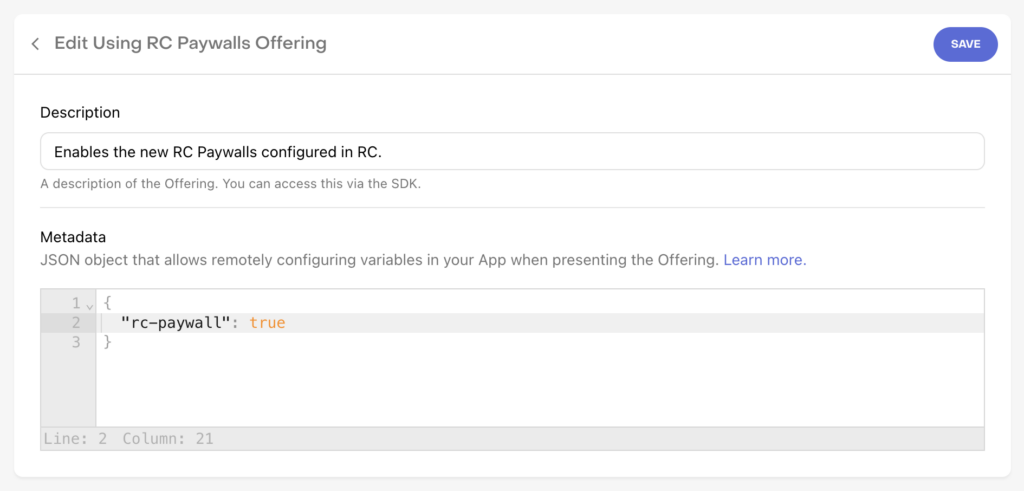
Now, I have two Offerings that are exactly the same, except for the value of the “rc-paywall” boolean in their metadata. Now I can jump into the code and switch which paywall I show to my users based on this metadata value.
if currentOffering.metadata["rc-paywall"] as? Bool ?? false {

    // show custom build paywall

} else {

    // show RevenueCat Paywall

}
Now if my app receives an Offering with the rc-paywall metadata set to false it will render my previous custom-built paywall. And if it’s set to true it will render my new RevenueCat paywall. Once I submitted this update to the App Store and gave it some time to propagate to most of my users, all of the prerequisites were done to allow me to run an experiment and ensure my new RevenueCat paywall was working as intended.
Running the experiment
RevenueCat Experiments allows you to send two different Offerings to your customers and then compare the performance of each offering across a variety of subscription metrics.
Setting up the experiment was simple. In the RevenueCat Dashboard, click the “Experiments” tab on the left, then click the “+ New” button on the top right.
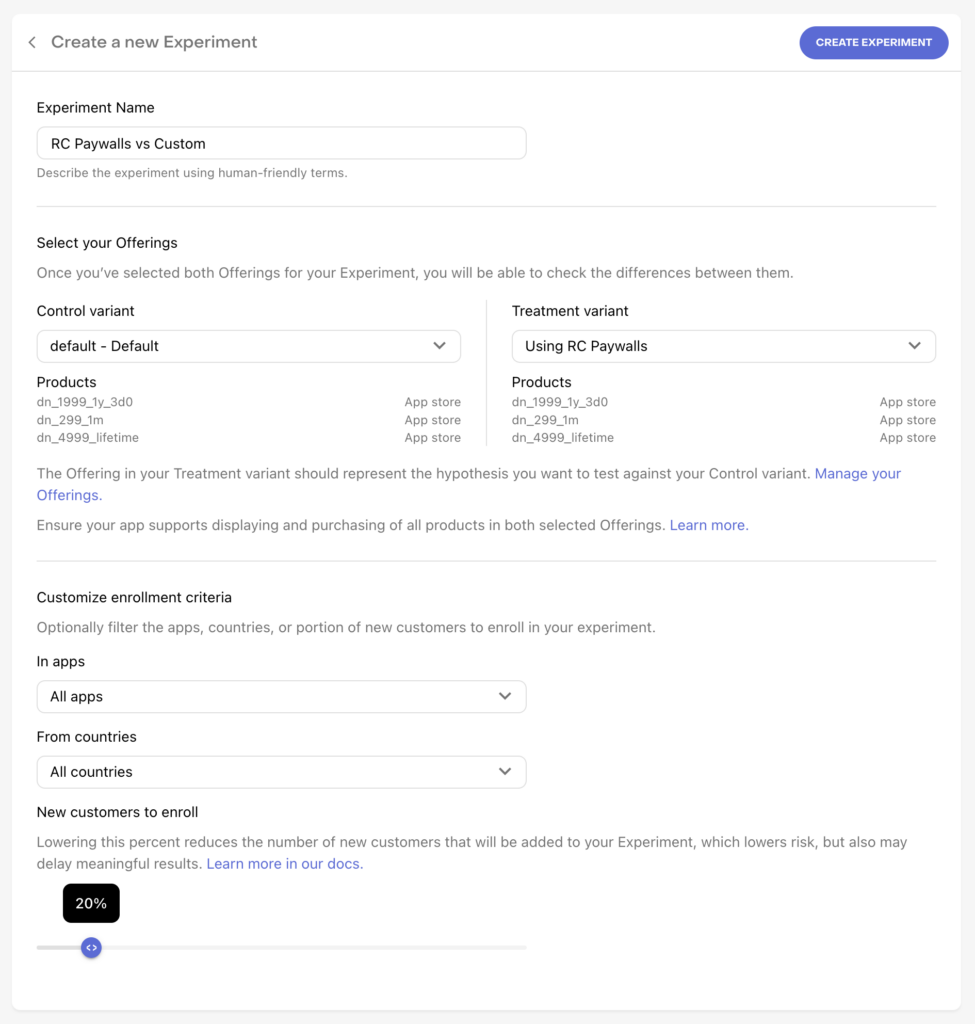
Here you can give your experiment a name, pick the two Offerings you want to compare (in my case “default” vs “Using RC Paywalls”) and then customize the enrollment criteria.
Notice I set my “New customers to enroll” slider to 20%. This means only 20% of new users will be enrolled in the experiment. And half of those users will be shown the RevenueCat paywall treatment. So effectively this meant, to start, only 10% of my users would see the new RevenueCat paywall.
I did this for a day just to ensure that purchases were working correctly on the new paywall. After I got confirmation that they were working, I ramped the experiment up to 100% which meant 50% of users would see the RevenueCat paywall, and 50% would see the old custom paywall.
After this, I just had to wait. I checked in daily to make sure that there wasn’t a catastrophic drop in performance, but otherwise I tried to let a large enough number of customers into the experiment that it gave me some confidence that everything was working.
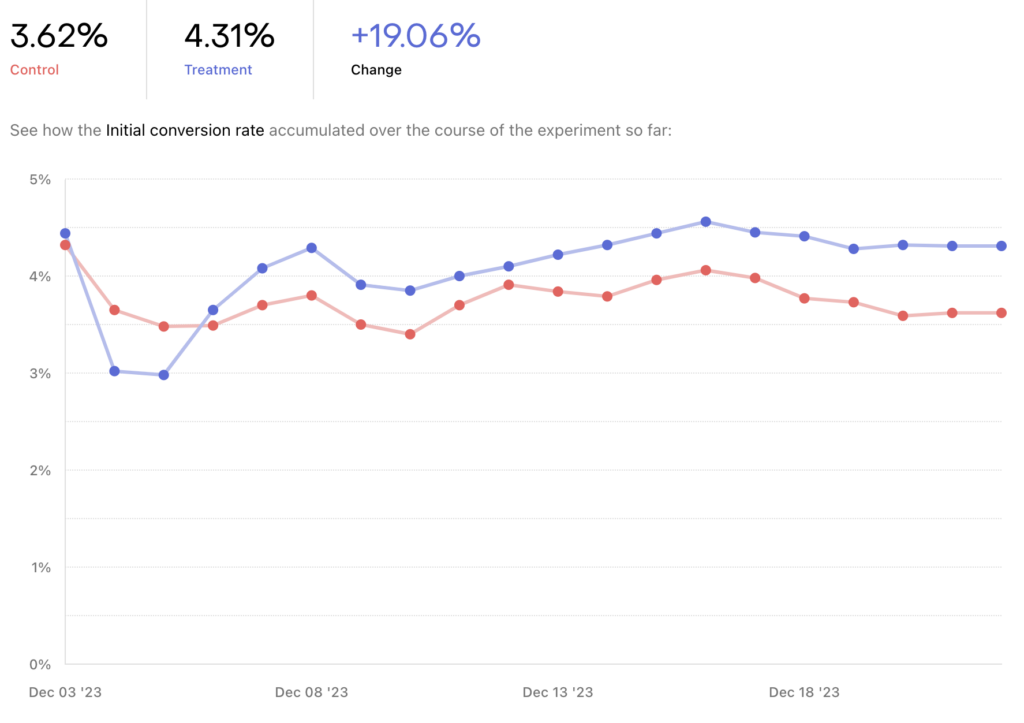
Here’s how my Initial Conversion Rate looked after two weeks:
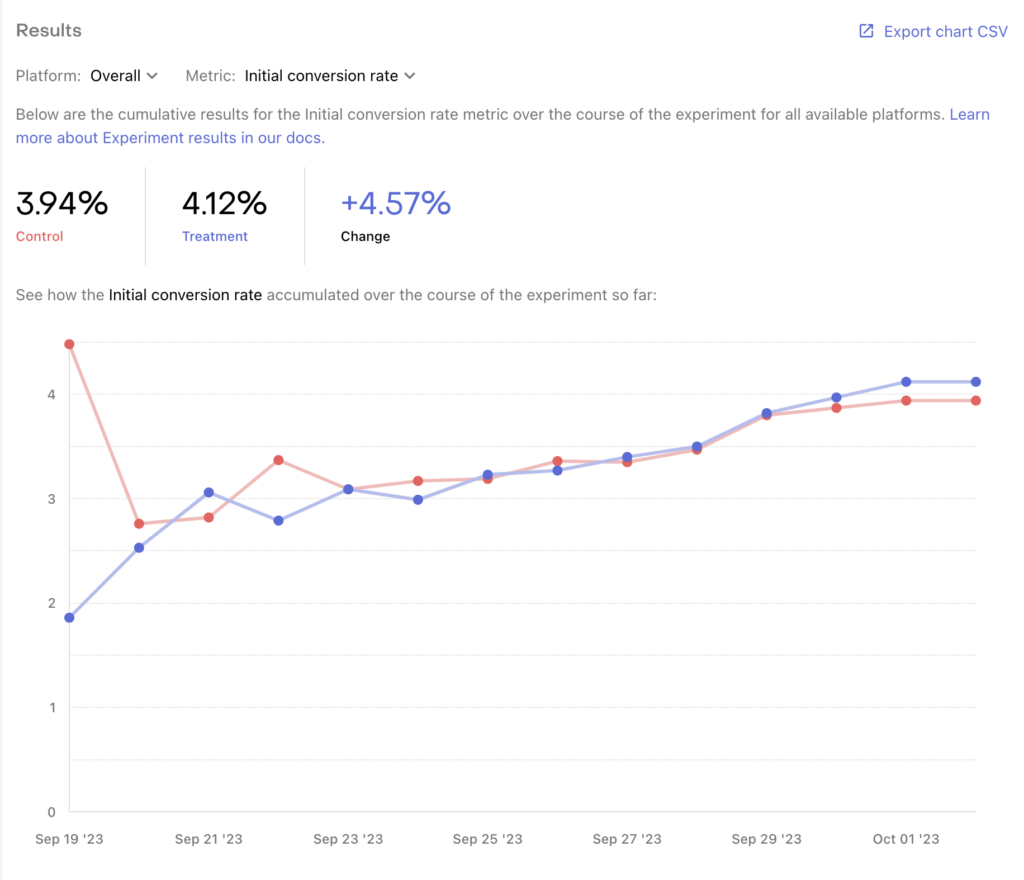
It’s important to note that with the size of my app, this only represented about 11,000 customers, which means this 4.76% improvement isn’t necessarily statistically significant. But I wasn’t looking for a dramatic improvement here. My design was almost identical. My goal was to simply confirm that I hadn’t caused any unforeseen effects — based on this result, I felt confident that I had not!
The benefits of using RevenueCat paywalls
Now that my paywall is being dynamically driven by RevenueCat paywalls, I can easily run other experiments whenever I want from the backend. Since then I’ve been trying to always have an experiment running to continually see if there are optimizations I can make to my paywall. Let’s walk through one experiment I recently ran to showcase how powerful these can be.
Show all products vs single product by default
My paywall has always shown a single product, Annual, by default and users had to tap the “All Plans” button to see the Monthly and Lifetime options. I’ve heard that many paywalls actually perform better when they show all plans immediately, so I figured I’d give that a try.
Because I’m using the RevenueCat footer view, I can easily switch between showing one product by default or all products by setting the condensed property. I drove this with a property on my Offering metadata, so I could easily run an experiment comparing the two designs.

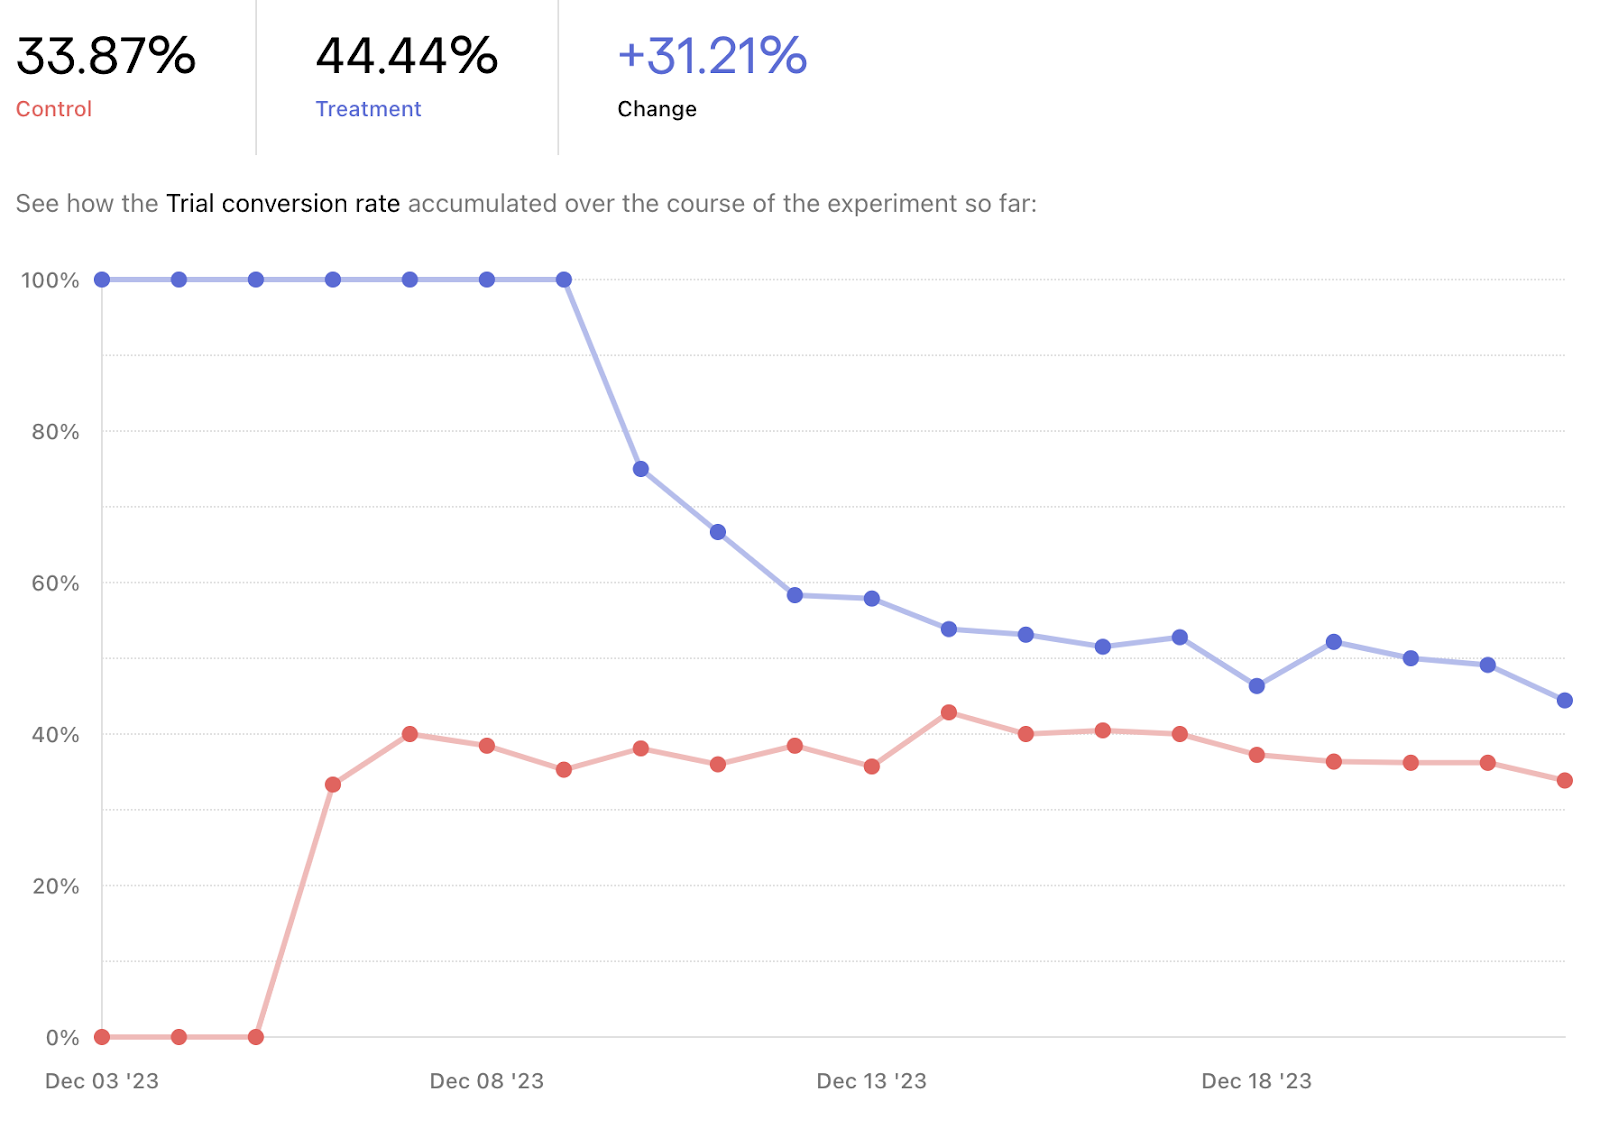
The results here were fascinating!
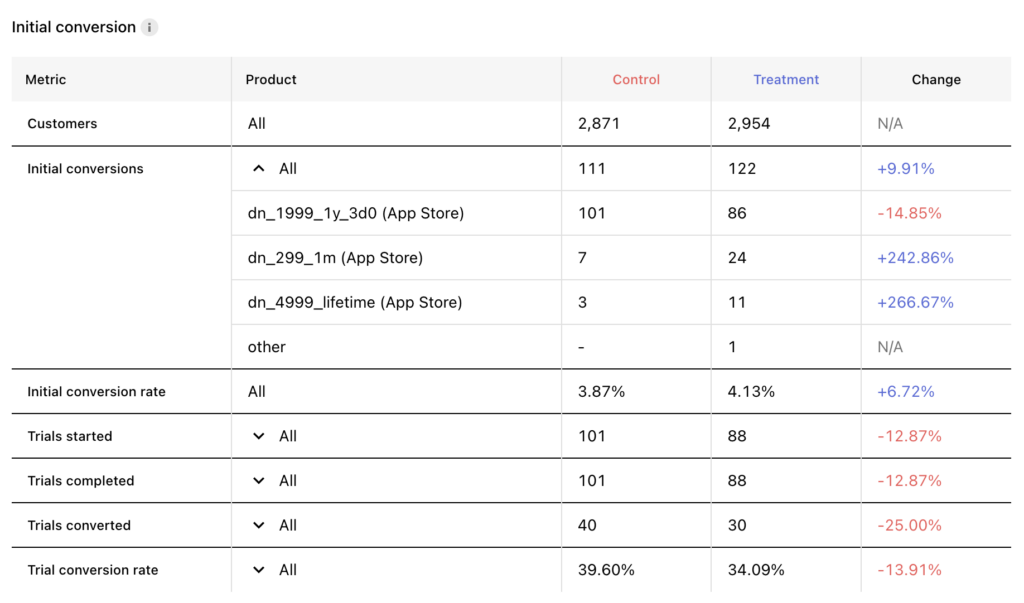

Apologies for the wall of data here, but I think this result really highlights the importance of measuring performance across all of your subscription metrics when running an A/B test with paywalls.
As you might expect, Monthly and Lifetime plans got a huge boost to initial conversions, +242% and +266% respectively. But that came at a -30% cost to the Annual plans. Overall though, initial conversions did increase by almost 10%.
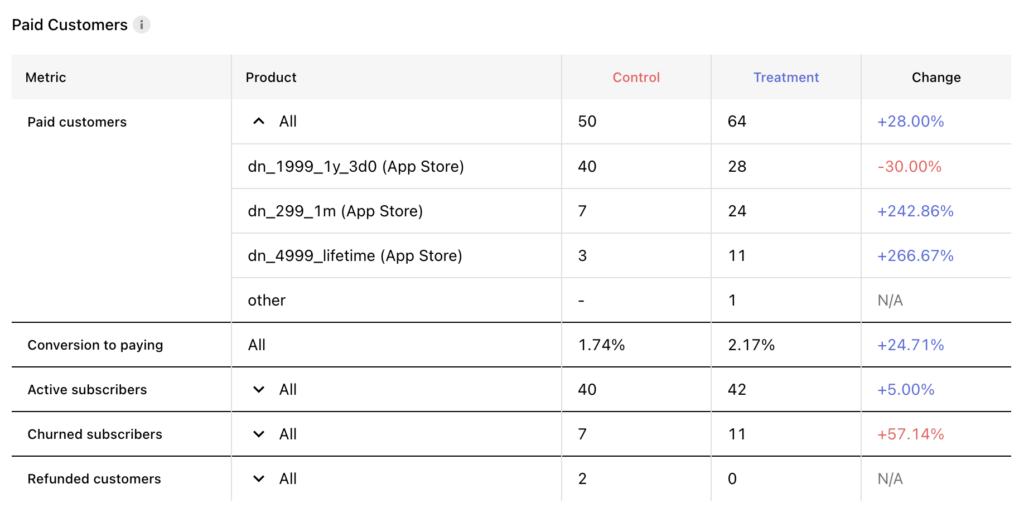
Churn has increased pretty significantly at 57%, but that is to be expected whenever a larger portion of my mix is now monthly subscribers. I’ll be interested to see how that number changes after the one year mark.
An interesting note about RevenueCat experiments is that even after stopping your experiment, we continue to measure the existing customers for the next 400 days. This means you can compare LTV over longer periods of time, and see differences in how each cohort churns.
For example, here’s the chart for my Realized LTV about a month since I stopped the experiment:
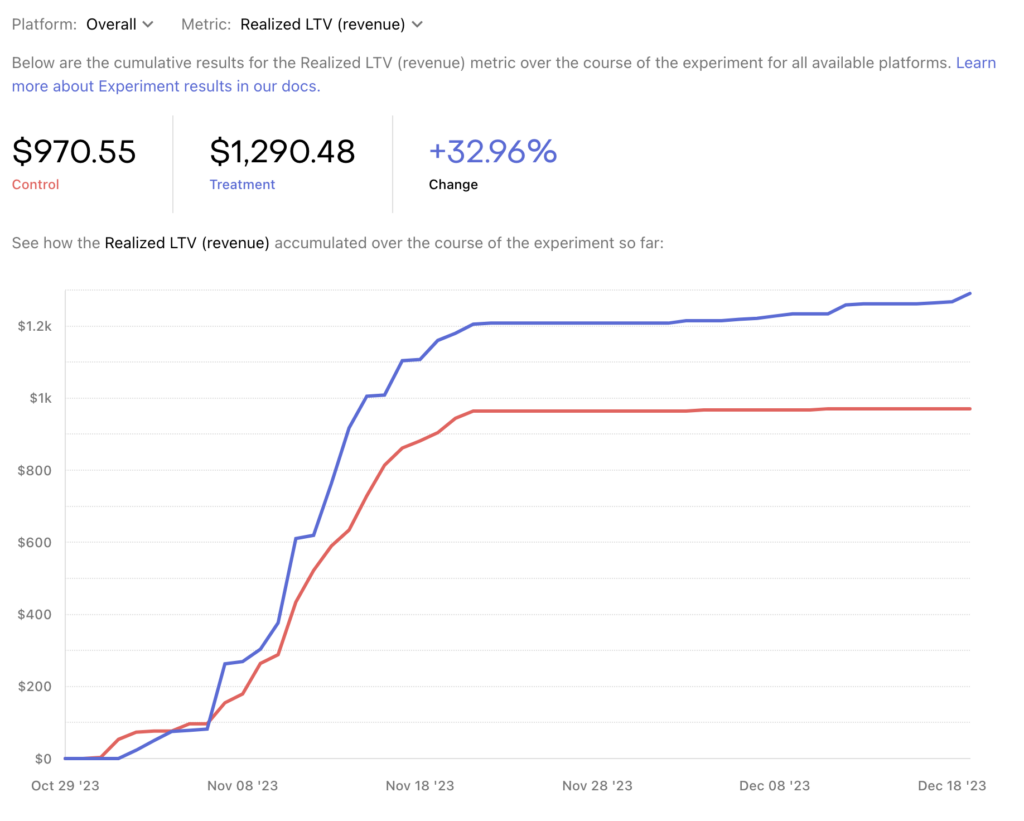
Even though I stopped the experiment after a few weeks, you can see my treatment continues to rise a little bit as its monthly subscribers renew. Once I reach a year after the experiment, I’ll see renewals from all of the annual subscribers in both cohorts and can compare which one really performed best in LTV.
Trial length
I’m currently running an experiment comparing performance of my current 3-day trial vs a 7-day trial. I think this one will qualify for its own blog post once I have more data, but here’s a sneak peak at the current results. So far it looks like 7-day trials are performing better!
Black Friday promotion
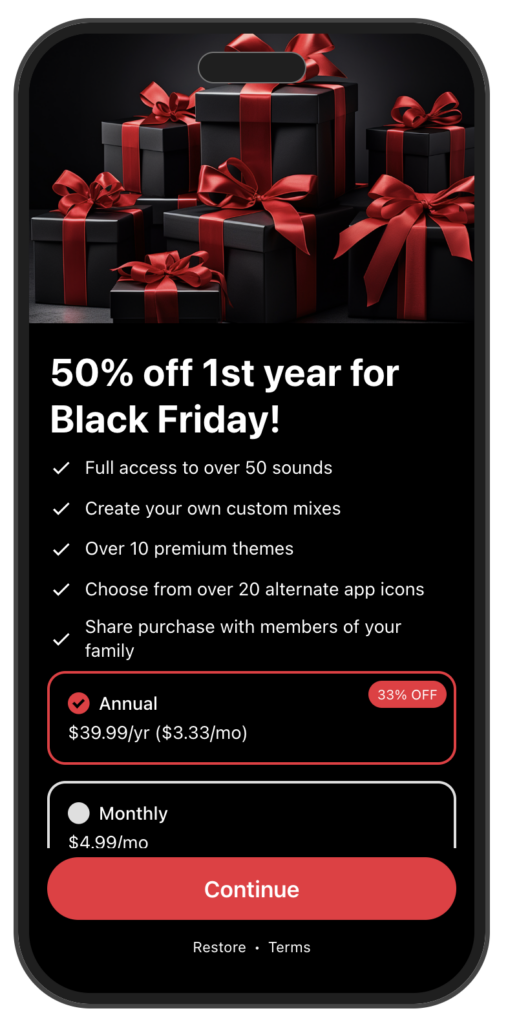
Another benefit of using RevenueCat Paywalls was how easily I could set up a limited time promotion. Black Friday snuck up on me and I needed to set up a sale quickly. I’ve written about how to run a holiday sale for iOS apps before, and I decided to go with the simplest option of simply updating my existing introductory offer to include a discount for the first year. But I still wanted to update my paywall to reflect that I was running a sale.
Fortunately, I had set up my app to have the option of displaying a full screen RevenueCat paywall, instead of just the footer view, based on a property set on my Offering metadata. This meant I could easily build a new paywall in the RevenueCat dashboard and push that out to users without needing to update my code and submit an app update.
Here’s the paywall I ended up building:
To start showing the Black Friday paywall, I simply set the Offering with this new paywall design as my current Offering. This can actually now be automated easily with our new scheduled targeting feature.
Final thoughts
So far I’ve been thrilled with the decision to switch to RevenueCat Paywalls. It’s allowed me to continually run experiments and slowly optimize my paywall and revenue without spending a significant amount of time managing it. As always, if you have any questions please don’t hesitate to reach out to me directly at any of the various places you can find me online.
In-App Subscriptions Made Easy
See why thousands of the world's tops apps use RevenueCat to power in-app purchases, analyze subscription data, and grow revenue on iOS, Android, and the web.